
This dungeons you will have access to at level 34 or if you travel to the opening yourself at lower levels.
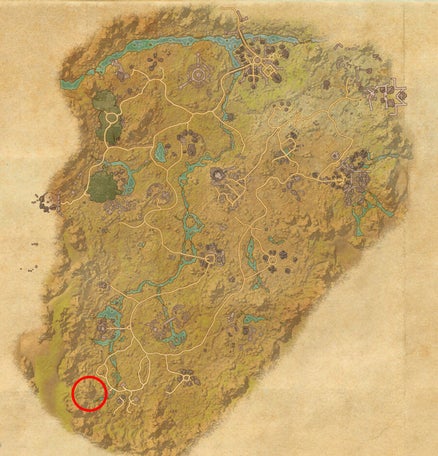
This is located at the South West of the Reaper’s March map as shown below.
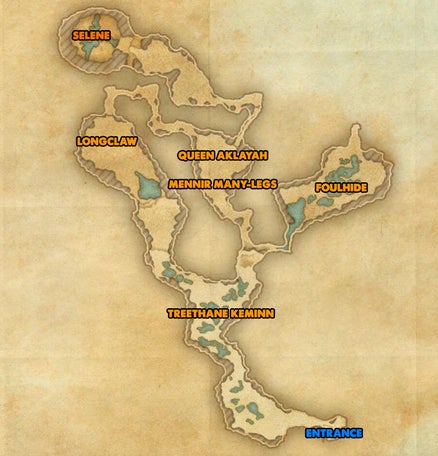
The bosses are marked on the map below with their names and locations. I shall explain their mechanics as well as what you should and shouldn’t do while facing them.
Boss Fights
Treethane Keminn
This boss is a very simple miniboss and isn’t too much of a threat however the group will need to pay close attention so they are not overwhelmed. On approach you will be greeted with MANY adds and the tank should try to position these in the middle with the boss. Aoe damage should be more than enough to kill the adds but be sure the boss is of course taunted although not the primary target to damage at this point. Once all the adds are down it is time for the group to focus the boss and stand in a nice clean circle. Everyone should have their own space so you can see exactly what is going on.
Cleave – Occasionally the boss cleave with an aoe attack, this is very simple to avoid and all you really have to do is step out of it. The tank can stay with the boss as not a lot of damage will be taken by the tank.
Ravens – This mechanic the boss with raise both hands in the air and pull the group in with webs to the center. During this phase several ravens will attack the group in aoe which isn’t too strong. Once the pull in and stun has faded the group should get back into positions and keep heals and damage up. This is a very simple boss and the damage incoming really isnt that strong, but running around the room will make a mess so be sure again to just circle the boss while the tank holds the boss still and you won’t have a problem.

Longclaw
This boss starts up high in a tree and 4 cats will attack you. The tank should grab the cats asap and the group need to kill them with aoe as fast as possible. Once dead the boss will shortly come down from the tree. DO NOT shoot with projectiles at the boss because they will be reflected back at you. After the shield has faded he will come down and the fight begins. Be sure that the tank keeps a taunt(even a ranged on) on the boss at all times.
Panthers – Spirit versions of the 4 panthers will spawn during the fight and they will re-spawn every time one dies, so it helps if you DON’T kill the panthers and the tank just holds them to one side away from the group while trying to keep a ranged taunt on the boss.
Volley – The boss will cast a volley attack throughout the fight, this is a small aoe which does a LOT of damage and should be avoided simply by taking a step out of it. there is NO need to run around like a headless chicken, if you are not standing in it, you are safe, simple.
Poison – The boss will cast poison clouds throughout the fight. These are quite large and do high damage over time but just like the volley can be avoided very easily by moving to one side.
Agility – This is a very agile boss and he loves to move around the room. So every few seconds the group will have to reposition themselves to keep up with him. Stay with the boss, avoid the aoe’s and you will be fine.
Remember do NOT kill the cats when they are green.
Queen Aklayah
This boss incredibly simple and requires little effort to take down. The tank should hold her very still facing away from the group while the dps and healers do their job.
Heavy Attack – Does exactly as it says on the tin. The heavy attack can be blocked and will hit the tank or whoever has agro.
AOE – Whoever has agro (should be the tank) will have a negative aoe attached to them throughout the fight, this is very simple…stay AWAY from the tank and it wont hurt you. Some common sense should be applied here. Don’t stand in it.
Hoavors – Throughout the fight small Hoavors will spawn near the boss and attack the group. These are incredibly low health and standard to low aoe damage is more than enough to kill them. Do not run away as this will not help. keep doing what you are doing and let the tank pin the targets so they can be controlled and killed quickly.
Foulhide
This boss is actually very simple although he looks a lot bigger than he really is. There is a lot going on in the fight and the team need to stay together but so long as the boss is taunted you shouldn’t have a problem. There are mechanics to follow but they are very straight forward and obvious to spot.
Stomp – The boss will stomp and do damage in a small frontal aoe attack. Anyone caught in this will take a LOT of damage, if you are a tank you can block it but dps and heals should step out of this. BUT lets face it no one but the tank should be standing in front of the boss!
Stranglers – Every time the boss stomps more and more stranglers spawn in the room, they barely do anything at all, although they look scary. Just don’t damage them and they won’t interact with you.
Charge – This HUGE straight line AOE attack is very easy to spot. Just like sword and board enemies, the boss will charge in a straight line until he hits the edge of the area. You can block this but there is no need, it is so huge and obvious you should be able to have plenty of time to just step out of it. move away, let the boss pass then continue taking him down where he finishes his charge.
Roar – Occasionally the boss will roar and the group will be feared into random directions. This lasts about 2-3 seconds and you loose all control of your character you run away.
However you can break free of this. So all you have to do is keep enough stamina through out the fight to break and this will never be a problem. Very similar to the lion boss at the beginning of Volenfell.
Above all the boss will move around so the tank should stand in front, the group should stand behind and each time the boss moves, move with him and get back into formation. Despite his size this is a very slow sluggish and easy boss to kill.
Mennir Many-Legs
This boss is in the same place as the queen boss you’re fought on the way up towards the bear. She has very low health and her attacks CAN deal a lot of damage but there is a little trick to this boss which makes things a lot easier…INTERRUPT!
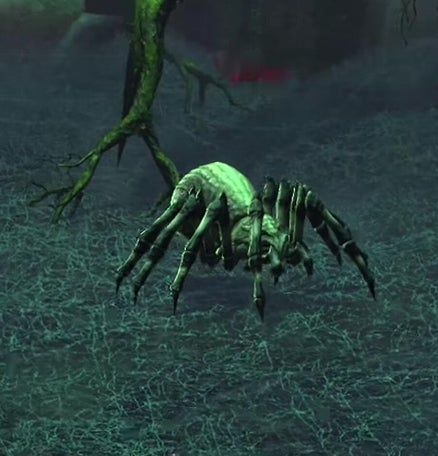
Spiders – he boss will constantly call down many many small spiders into the fight. So long as you have lots of aoe damage down on the floor (even low aoe) they will die fast, they are really squishy.
Shock – The boss can cast shock aoe effects which do hit pretty hard but this can be interrupted so you never have to deal with it so long as you are on point with your interrupts.
Curse – The boss will cast a single target curse type dot on a target of her choice, BUT this is incredibly easy to avoid since you can either dodge roll it OR interrupt her.
This boss’s attacks can constantly be interrupted so as long as you keep an eye on these and stop her from firing off her abilities she can cause almost NO threat to the group. BUT if you are not on point the attacks can hurt a lot. Keep your eyes open for that flashing red telegraph/sparks type image and bash/interrupt her when you need to .
Selene
This one is a tricky one! here can be a lot going on but there is one MAJOR mechanic that must be taken care of in this fight. There are two phases but one attack in particular can cause the group to wipe. I have seen this done wrong repeatedly in pick up groups so hopefully this helps fix that. The boss should ALWAYS be faced away from the rest of the group. So the tank must hold a taunt and the direction of the boss 100% of the time.
Phase 1 (spider) – Selene starts as a giant spider and her attacks are similar to that of an average spider, with some nasty heavy attacks. The group should be BEHIND the boss in a semi circle while the tank keeps the boss facing away from them. Once she goes low health she will pull everyone in and drag the group through the web and lower into the ground. Once there you will have to push her to ALMOST death.
Phase 2 (Selene) – This is her more Humanoid form and a LOT of mechanics start to take place. Position your group in a semi circle around the boss, do NOT run around the room, focus, and the tank should always face the boss AWAY from the group!
Adds – Two hander, archers and healer mobs will spawn around the room. The two handers have a nasty habit of heavy attacking (uppercutting) group members so your tank should chain these in fast and control them. If you get heavy attacked you MUST block. Healers and archers should be interrupted while the tank tries to pull them in without spinning the boss.
Panther spirit – IF you are too far away from the group, rather than the jump mechanic that a lot of bosses have, the panther will be summoned to that group member and hit them with an “unavoidable” attack. You should be blocking if this is aiming for you to mitigate the damage.
Webs/ravens – Just like the first boss you will be all pulled into the middle together and ravens/bats (are they ravens or bats?) will swarm in a large AOE. These do a lot of damage so as soon as the webs have dropped you must leave the damage circle. Instead of running around the room however, usually in a semi circle the left and right group member will be switched (so they are standing on opposite sides to which they once were. Use this as a tactical advantage and simply move out of the circle on the side you are NOW on rather than criss crossing about to get back where you were. relax, get back into the semi circle formation and you will be fine.
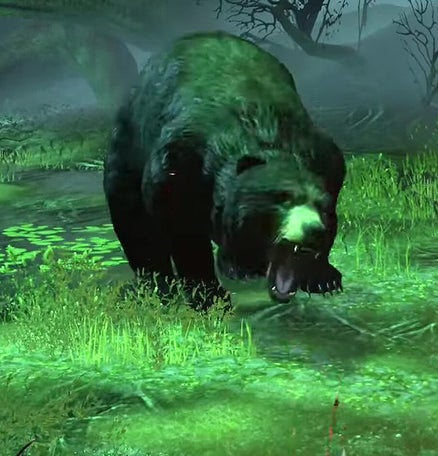
BRAVE STAR! (bear attack) – call this the brave star attack. Basically just like the Selene’s monster set a bear (foulhide spirit) will spawn from Selenes feet and it will heavy attack in aoe in front of her…it is CRUCIAL that you do NOT spin the boss around during this attack else it WILL hit the group and one shot them. A VERY tanky tank can block this, but if you are a squishy tank, simply move to the side, let it pass and get back in. NEVER spin the boss!
Good luck!