Cloudrest
Cloudrest can access at ANY level, however VETERAN Cloudrest (VCR) can only be accessed once you are level 50+.
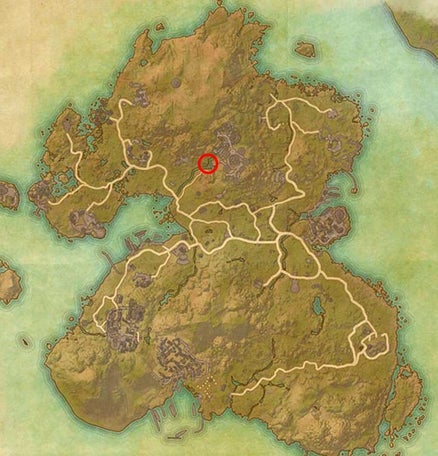
It is located in the middle of the Summerset map (shown below) and does require the Summerset chapter.
The bosses are marked on the map below with their names and locations. I shall explain their mechanics as well as what you should and shouldn’t do while facing them.
Location
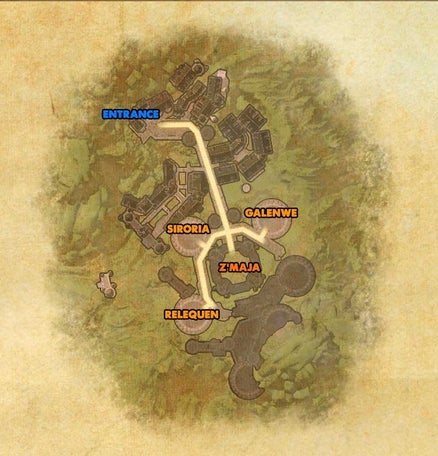
Boss Fights
Siroria
Each Mini boss fight is borderline the same in most respects in application as far as positioning and BASIC mechanics are concerned. However they do have their own UNIQUE mechanics that you must be aware of.
In general however, there should be two tanks. ONE tank holds the Gryphon one side of the room and the other one holds the Mini boss on the OTHER side of the room. The boss will teleport a lot so be mindful of this when repositioning if you have to.
So long as they are no where near each other they will NOT enrage each other. Simple stuff. Each boss can heavy attack the tank so they must Block it (or dodge it if they really have to) and all will be fine…
Now to just deal with the difficult parts!
HUG ME! – The HUG mechanic is Siroria’s most unique mechanic and in fact the FIRST time this was introduced to the the game. Unlike MOST negative AOEs this one requires you do NOT separate from the group and/or avoid it.
One player will get a spreading yellow circle under their feet. When it reaches full size it will explode and kill the player.
What you MUST do as a team is stack up and share the damage. You need a minimum of 3 people stacked in order to not kill the player. MORE technically doesn’t spread the damage any further but better safe than sorry right?
Running around like a headless chicken WILL kill you because people won’t be able to catch up with you and stack with you. So relax, stand still, let the group stack. When it goes boom, all are safe and carry on as normal.
This is one of the only AOES in the game now (there are a couple more since Summerset) that require you to STACK when bad stuff happens!
Dragonknight Standard – Much like the Dragonknight Ultimate, Siroria will cast a Dragonknight Standard. This causes HIGH damage if you are inside it and she is also stronger for being inside it.
Don’t get caught inside of it and be sure as the tank to remove her from that location. Easy mechanic, but it can be a mess if you don’t avoid it!
Dragon leap to Fire Tornado – During the fight around 50% Siroria will start dragon leaping (like the DK ultimate). There will be a big landing aoe that you must avoid OR if you get unlucky at least block it. But don’t hang around…
When this lands there will be 3 spinning fire Tornado effects. These spread out and move slowly before disappearing but do NOT get hit by them. A couple of ticks of damage will kill even tanky dps/healer players.
Griphon Bleed – During the fight the Gryphon will attack the tank with a HIGH damage hit which adds a bleed to them. Chunky tanks can be out healed with this on them BUT if you want to NOt take damage form it, you can dodge roll the attack completely. However bare in mind, too much running around dodging will keep moving the boss and the DPS will have to keep reapplying their skills to keep up.
This can be a pretty mobile fight for the most part so running around isn’t really helpful, but whatever works for you.
Burst AOE Stuns – When the Gryphon is in the air it iwll launch multiple AOEs spreading across the room. These fan out from a central point so if you are further away the gaps are larger, if closer it is trickier to avoid. basically, find a gap and avoid them. If you fail, you will take low damage and be stunned. So watch your feet but maintain stamina just in case you get caught.
Cone/AOE Attack – The Gryphon will occasionally cast a rather nasty AOE slam and also frontal AOE cone attack, this should always be facing the tank and can be blocked. DPS have no business being in front of the giant bird, so avoid this if you are a squishy!
Portals – The portal will appear in the middle of the room during the fight. You should preplan TWO groups in your team. YES it can be done solo or with two people but if you are new, make TWO groups of 3-4 players, even with a healer if you like.
What will happen is ONE team will need to go down stairs into the portal.
While down there, there will be crystals. Each one destroyed may reveal an orb. This will then make a spear reveal UPSTAIRS…
Someone upstairs will need to take a synergy to make that spear go DOWNSTAIRS…
As the down stairs team do NOT touch the orb UNTIL that spear has been sent down. If that has happened, pick it up, and deposit it in the spear effect.
This must be repeated 3x. Once it has been completed the portal will disappear and you can go back to the fight.
Be sure to take your own heals. The damage you take downstairs is oblivion damage so shields do not work. Also if you pick the orbs up too early you will take HUGE damage so do not do it unless a spear is there.
Finally about the portals, there are adds. These will go upstairs of course. But the longer you take the more adds you will get. If you fail the portal MANY giant Yagra adds will come out. These will cause a huge problem and you will have to deal with them if this happens (which usually results in a wipe).
Whether the portal was successful or not, ALL members of that particular team with have a debuff on them. This will prevent them from going down again so the other team must got down next time.
By the time the next portal is over you can go again. This is why you need two teams.
It is pretty simple once you understand it but may take some practice!
Execute – The trick to this fight is making sure both bosses are VERY low health before you decide to kill ONE of them. That way you have low health on the other one and can kill it quickly afterwards.
If you kill one boss too soon, you will have too long left on the other while they make creepers appear in the room. These MUST be killed because they do damage and root the group, but it will get more and more aggressive with more spawns the longer you take.
So while there is not a “dps race” as such, you DO want to be sure to control your damage to not have one boss alone for too long.
Relequen (aka posh boy!)
This boss follows the same rules as the ones above apart from the unique mechanics. Keep them split apart at ALL times. Hit the Gryphon all the time unless the Gryphon is in the air, in which case switch to the main boss. When it comes back down, switch back again! The boss will teleport a lot so be mindful of this when repositioning if you have to.
Cone Attack – The boss will cast a HUGE cone AOE at the group. This is easy to avoid, simply block it, OR dodge roll as it hits. If you get hit by it it will knock you back and do moderate damage.
Heavy attack/Staff flip – The boss will spin his staff like a ninja and fire off a heavy attack. While the tank will need to block this, several shock effects will fly across the floor from the boss location. Step out of these or you will be stunned. You can BLOCK to mitigate the damage but you have to be careful to keep enough stamina to break in case you get stunned mechanics can stack fast. The easy way to avoid this is to step back a bit and have a clearer view of where the sparks are going to be able to completely step around them.
Lightning Channel – This mechanic is very dramatic but super easy to avoid. ALl players will have a spreading lightning AOE attached to them. And when it spreads it will go BOOM. While spreading out and blocking is a way to make sure no one dies, it is MUCH simpler than that. Simply interrupt Relequen, and it all goes away!
OMG SWAP BARS! – One of the most UNIQUE mechanics in the entire game along with the HUG mechanic (this trial brought some weird stuff for sure)… IF a player has a big blue lightning beam on them, they are soaked in lightning. From THEIR perspective the whole area around them for about 20meter radius will constantly channel lightning damage to THEM and ALL players caught inside of it. It’s extremely unlikely that the whole group will survive this. So you have to follow a very simple rule.
SWAP BARS! Whatever bar you are on, SWAP to the other one, and STAY there until the debuff has gone. Do this as soon as you see it and problem solved, fail it and you will kill people.
There will be a debuff at the end of your debuffs bar (if you have them showing) with lighting in it. Once that has gone, it is safe to come back to the other bar.
However a little advanced…IF you know this mechanic and you have subtitles on. You can preplan the bar YOU want.
When you see the subtitle coming saying you are the target to be overcharged, simply stay on the bar you DON’T want to be on….then the mechanic will appear, telling you to swap. NOW you are deliberately FORCED to be on the bar you want to be on. Explained in the video to, very advanced yes, but an experienced player (especially healer) can really benefit from this.
Griphon Bleed – During the fight the Gryphon will attack the tank with a HIGH damage hit which adds a bleed to them. Chunky tanks can be out healed with this on them BUT if you want to NOT take damage form it, you can dodge roll the attack completely. However bare in mind, too much running around dodging will keep moving the boss and the DPS will have to keep reapplying their skills to keep up.
Burst AOE Stuns – When the Gryphon is in the air it iwll launch multiple AOEs spreading across the room. These fan out from a central point so if you are further away the gaps are larger, if closer it is trickier to avoid. basically, find a gap and avoid them. If you fail, you will take low damage and be stunned. So watch your feet but maintain stamina just in case you get caught.
Cone/AOE Attack – The Gryphon will occasionally cast a rather nasty AOE slam and also frontal AOE cone attack, this should always be facing the tank and can be blocked. DPS have no business being in front of the giant bird, so avoid this if you are a squishy!
Portals – The portal will appear in the middle of the room during the fight. You should preplan TWO groups in your team. YES it can be done solo or with two people but if you are new, make TWO groups of 3-4 players, even with a healer if you like.
What will happen is ONE team will need to go down stairs into the portal.
While down there, there will be crystals. Each one destroyed may reveal an orb. This will then make a spear reveal UPSTAIRS…
Someone upstairs will need to take a synergy to make that spear go DOWNSTAIRS…
As the down stairs team do NOT touch the orb UNTIL that spear has been sent down. If that has happened, pick it up, and deposit it in the spear effect.
This must be repeated 3x. Once it has been completed the portal will disappear and you can go back to the fight.
Be sure to take your own heals. The damage you take downstairs is oblivion damage so shields do not work. Also if you pick the orbs up too early you will take HUGE damage so do not do it unless a spear is there.
Finally about the portals, there are adds. These will go upstairs of course. But the longer you take the more adds you will get. If you fail the portal MANY giant Yagra adds will come out. These will cause a huge problem and you will have to deal with them if this happens (which usually results in a wipe).
Whether the portal was successful or not, ALL members of that particular team with have a debuff on them. This will prevent them from going down again so the other team must got down next time.
By the time the next portal is over you can go again. This is why you need two teams.
It is pretty simple once you understand it but may take some practice!
Execute – The trick to this fight is making sure both bosses are VERY low health before you decide to kill ONE of them. That way you have low health on the other one and can kill it quickly afterwards.
If you kill one boss too soon, you will have too long left on the other while they make creepers appear in the room. These MUST be killed because they do damage and root the group, but it will get more and more aggressive with more spawns the longer you take.
So while there is not a “dps race” as such, you DO want to be sure to control your damage to not have one boss alone for too long.
Galenwe
This boss follows the same rules as the ones above apart from the unique mechanics. Keep them split apart at ALL times. Hit the Gryphon all the time unless the Gryphon is in the air, in which case switch to the main boss. When it comes back down, switch back again!
The boss will teleport a lot so be mindful of this when repositioning if you have to.
Meteors – During the fight 3 people will be selected for an Ice Comment type attack. Each player must spread out to an empty space and BLOCK till it lands. Then rejoin the group. If you stack you will kill each other.
Hoarfrost – Apart from basic heavy attacks and such the boss does have this very UNIQUE mechanic. There will be a small spinning wind on the ground. It will constantly do damage in AOE to the group. When you see this a player MUST pick it up and hold on to it. After about 6 seconds of so they will be presented with a synergy to DROP it. Try to drop it outside the group, if you can. It will slow you down and do high damage and even more so if you don’t drop it.
When it is on the ground again someone ELSE must pick it up. This must be repeated 3x and can’t be done by the same person twice per phase. Once this is successful 3x then it will fade for a while before you have to do the mechanic again.
BIG TIP: Do NOT take this into the portal!
Gryphon Bleed – During the fight the Gryphon will attack the tank with a HIGH damage hit which adds a bleed to them. Chunky tanks can be out healed with this on them BUT if you want to NOT take damage form it, you can dodge roll the attack completely. However bare in mind, too much running around dodging will keep moving the boss and the DPS will have to keep reapplying their skills to keep up.
This can be a pretty mobile fight for the most part so running around isn’t really helpful, but whatever works for you.
Burst AOE Stuns – When the Gryphon is in the air it iwll launch multiple AOEs spreading across the room. These fan out from a central point so if you are further away the gaps are larger, if closer it is trickier to avoid. basically, find a gap and avoid them. If you fail, you will take low damage and be stunned. So watch your feet but maintain stamina just in case you get caught.
Cone/AOE Attack – The Gryphon will occasionally cast a rather nasty AOE slam and also frontal AOE cone attack, this should always be facing the tank and can be blocked. DPS have no business being in front of the giant bird, so avoid this if you are a squishy!
Portals – The portal will appear in the middle of the room during the fight. You should preplan TWO groups in your team. YES it can be done solo or with two people but if you are new, make TWO groups of 3-4 players, even with a healer if you like.
What will happen is ONE team will need to go down stairs into the portal.
While down there, there will be crystals. Each one destroyed may reveal an orb. This will then make a spear reveal UPSTAIRS…
Someone upstairs will need to take a synergy to make that spear go DOWNSTAIRS…
As the down stairs team do NOT touch the orb UNTIL that spear has been sent down. If that has happened, pick it up, and deposit it in the spear effect.
This must be repeated 3x. Once it has been completed the portal will disappear and you can go back to the fight.
Be sure to take your own heals. The damage you take downstairs is oblivion damage so shields do not work. Also if you pick the orbs up too early you will take HUGE damage so do not do it unless a spear is there.
Finally about the portals, there are adds. These will go upstairs of course. But the longer you take the more adds you will get. If you fail the portal MANY giant Yagra adds will come out. These will cause a huge problem and you will have to deal with them if this happens (which usually results in a wipe).
Whether the portal was successful or not, ALL members of that particular team with have a debuff on them. This will prevent them from going down again so the other team must got down next time.
By the time the next portal is over you can go again. This is why you need two teams.
It is pretty simple once you understand it but may take some practice!
Execute – The trick to this fight is making sure both bosses are VERY low health before you decide to kill ONE of them. That way you have low health on the other one and can kill it quickly afterwards.
If you kill one boss too soon, you will have too long left on the other while they make creepers appear in the room. These MUST be killed because they do damage and root the group, but it will get more and more aggressive with more spawns the longer you take.
So while there is not a “dps race” as such, you DO want to be sure to control your damage to not have one boss alone for too long.
Z'Maja
The Giant Killer Slug herself! This boss is not really about “positioning” for the boss, since she will go where she likes, but more about which way you make her FACE.
The tank should ALWAYS make her face AWAY from the group. Failure to do so will result in a rapid wipe!
Teleport – from the very beginning of the fight, the boss will CONSTANTLY teleport around the room. Whenever she moves you must all reposition to her new location. This is very important for the tank…
You don’t HAVE to be particularly fast to get to her, but you DO need to maintain a taunt and aim her away from the group. So as the tank try to keep a long range taunt on the way TO her, and hug the edge of the map in order to get her to LOOK at you, while the group flank her. That is crucial for the next mechanic.
Orb blast – The boss will wind up a heavy attack in the form or a big ranged purple orb, aimed at whoever she has aggro on. You can as the tank, BLOCK this, or you can activate any ranged protection abilities you may have on your set/skills/class.
Mind Blast – During the fight specifically when she teleports, she will aim at whoever she has aggro on (should be the tank) and blast multiple mind blast attacks. Now while the tank can block this and take the damage, the DPS and healers will NOT last long. If she can see JUST the tank, she will only hit the tank, if she can see more people she will hit them too! So she MUST be facing away from them at all times if possible. This is tricky with all the teleporting but practice will make this easier.
AS for the group, if you KNOW which way she is facing, while the tank is trying to get into position, deliberately (regardless of range) try to flank her so you are not in her line of sight
ORBS – During the fight repeatedly even during execute, groups of 3x orbs will appear in the room slowly moving towards the boss. These MUST take pure priority over ANYTHING else in the room. If you kill them then problem solved. Take as long as you like in the fight, there is no dps check as such, but these MUST die.
If you don’t kill them in good time, they will explode into multiple tiny ones and stun players. There are so many mechanics that getting stunned is really bad in here.
Also if you get to close and TOUCH them, they will explode with the same result. They also hit really hard if you are hit and stunned you are lucky not to die.
Kill them at all costs.
A simple mechanic people are generally pretty complacent about when there really is no need.
Death Shadows – This one is another UNIQUE mechanic to the game. Generally if someone dies, i will tell a dps or someone free to get them up right away. DO NOT do that in this fight.
In this fight, if you see someone DIE, look for their shadow. There will be ONE shadow per dead player. They only have 100k health and they NEED to die.
After the shadow is dead then you are free to resurrect the player. If you don’t kill it first, initiating a res will kill you in one shot.
SO, say it out loud…”Kill first, REZ second!”
Darkness – This is simple but the reason why people tend to opt for an out in the field long ranged healer. The TWO furthest away from the boss will BOTH get a dark beam on them. This will emit a large ground based aoe which chases the player.
Simply kite this (move away from it in a circle) until it is gone.
The tank and the far(back) healer will be the two that get this IF you get it right. YES that means the main tank will have to keep aggro on the boss while moving back and forth a bit and have to adapt to the situation, HOWEVER, if you have multiple tanks, you CAN have a spare tank out in the open to be the other kiter to make it easier on the main tank. But that is up to you.
So remember, the furthest away will have this on them. So during the fight if you are a dps and it is on you, keep it AWAY from the group or you will kill them.
Pizza! – This is one pizza you don’t want to be near. After 60% health of the main boss, there will be large cone shaped aoe attacks coming from the portal in the middle of the room. Keep OUT of this. IF you land in it, you will be pulled down stairs. If however you are down stairs it will bring you back up.
Bare in mind, even if you were not supposed to be downstairs this turn, you will get the debuff meaning you cannot go in the portal because you will die. SO someone else will have to take your turn.
Simply run out of this AOE whenever you see it.
Portals!! – This follows the same rules as all of the other bosses (see above) with a slight twist.
Down stairs there are MORE crystals, so there are some fakes. Also during the downstairs mechanics there is a BIG spreading boom mechanic. When this happens you must jump into a wind synergy to take it, which will catapult you in the air on a ledge so you don’t die. Once it goes boom you can come back down, else the ledge will explode. Be mindful of this at all times because it is quite fast.
One more MAJOR mechanic about downstairs. There is a SHADE of Z’Maja down there. She MUST be taunted by a tank or she will nuke dps/healers in one shots.
SO tactically, it is SAFER for you to wait until the tank is down stairs and has TAUNTED the shade before the rest follow.
Play it safe. This portal however is also LESS forgiving than the other boss fights.
Once the portal is successful, Yagra adds will come out and must be killed.
If you FAIL however, everyone dies. BOOM!
Focus clean mechanics and this will no longer be an issue, get greedy, go too fast, don’t wait for tanks, get cocky? and this will be a long day for you. Again, play it safe until you are GOOD at it.
Creepers – At 40% and under, creepers will appear in the room. These will root people and hit pretty hard if you stay in the effects. These also slow players down. Orbs take priority but these ALSO are now equally important.
The boss is not the main focus in his fight. The mechanics are. The boss can take as long as you like, but Orbs and Creepers (as well as the portal mechanics) MUST take priority over anything else.
EXECUTE – When the boss is almost down, the portal in the middle will open up and the shade of Z’maja from down stairs will come through. THIS is now your new target.
While most people think it is time to hit execute skills, you are infact wrong. This counts as a whole new fight since it has 100% health.
Much less than the main boss but 100% none the less.
Here you should split into two groups either side of her tail.
Have the main tank turn her away from the group while the off tank and a healer keep distance when needed to kite the darkness.
During this phase people MUST focus creepers and orbs.
You will see ground aoe’s being placed which you can avoid so watch your feet. Do NOT run around like headless chickens but do be aware, while you CAN recover from deaths, watch for the shadows (remember kill first rez second).
Again it does NOT matter how long it takes you to kill the boss. There is no “kill it fast or else”…relax, play mechanics, stay alive and you will be fine. There are some extras below however…
Marked Bane! – During the Execute phase, 6 people at a time will ALL get marked bane on them. This debuff takes their health to around 50% (which yes means other damage will more likely kill them because they are low health).
While this is dangerous it also has other issues.
While this effect is on them their healing DONE is massively reduced. But healing received is not.
The trick is to have someone ELSE heal you.
This is especially risky for the tank because they cannot self heal effectively and also have heavy attacks to content with.
Make sure your healers are on point with BIG heals.
High AOE heal over time stacking from the healers can be nice, but also big burst AOEs can help too.
Another one that people overlook is that if you have multiple stamina users, stacked echoing vigors can go a LONG way.
Essentially, while maintaining mechanics heals MUST be on point. If ever you wanted a “healer test” this one is it.
The only way to remove the debuff is for the target you are healing to hit 100% health.
This will happen on repeat 6 people at a time until the boss is dead.
HARDMODE!!!!
There are multiple different “hard modes” and the choice is yours.
There is what’s known as +1, +2 and +3
+1 is one boss + the main boss.
+2 is two bosses + the main boss
+3 is all bosses + the main boss.
How this works is simple. You do the entire last boss fight, just like you normally would. BUT instead you have the addition of boss mechanics from the min bosses.
You can chose (+1+2) to fight whichever bosses you want. For example if you wanted to +1 but DON’T want to fight Siroria, you can go kill her normally before entering this fight, same goes for the others. If you want ONLY Siroria, you kill the other two and THEN engage the last boss.
The choice and order of it all is up to you.
However regardless of what you decide, their mechanics and presence will be the same.
Galenewe – This follows the same mechanic as the basic boss. You will have all of the boss mechanics INCLUDING the Hoarfrost. The same rules apply.
Pick it up, hold it, drop it with a synergy, someone else picks it up. At execute you will have TWO of these, hence the two way split for the group, keeping the two separate.
Siroria – Exactly the same mechanics as the main boss fight with her will all mechanics in tact INCLUDING the “HUG ME” mechanic. At execute be sure to stick to the 2 groups split up rule because you will get x2 of these and it is NOT a good idea to stack them.
Relequen – Just like the other bosses EXACTLY the same mechanics as the boss you fight on his own when you encounter him without Z’maja…and YES this means with the bar swap mechanics. Again splitting up at execute helps a lot with most of the mechanics and stops them overlapping but this one is as clear as day. SWAP bars when lightning is on you, or kill the group.
Final note before the tips! – The gryphons are NOT targets in the last boss fight. ONLY the knights! No story spoiler ofc!
TIPS: You do NOT have to over complicate things. If you want to do +1 +2 +3 it really is up to you but treat them the SAME.
When a mini boss comes in, take it AWAY from the main boss, go kill it away from the main fight, and come back when it is dead.
Yes you can go more advanced later but if you just want to “get it done” make it simple and stay away from the main boss and let the tank hold Z’maja while you deal with the rest of the basics (orbs, portals, etc etc).
As far as spawning is concerned Siroria Will spawn at 75% Relequen will spawn at 50% and Galenwe will spawn at 25% while ALL of their UNIQUE mechanics will be present from the beginning to the end of the fight whether they are dead or not.
If you decide to do +2 then the bosses you chose to fight spawn at 65% and 35%.
And if you do +1 the mini spawns at 50%.
One major bonus to these being killed. unlike VAS, they do NOT get back up. Once they are down they are down. Keep it simple.
If you want to make it really easy on yourselves, take 3 tanks. 1 on Z’maja, one kiting the darkness and taking the Add while the spare one goes downstairs. THEN when the portal comes up the next time, the off tank swaps with the other back and forth. Easy peasy, debuffs controlled and bosses controlled.
Practice practice , you got this!!!
GOOD LUCK!
Trial Loot
Here is a list of all the loot you can expect to find in Cloudrest. On normal the loot is green and regular and the boss does drop weapons but not jewellery unless you got for +1/+2/+3 but on veteran difficulty all of the loot is purple and is PERFECTED! The jewellery follows the same rules though, only on the harder modes.
Arms Of Relequen
Mantle Of Siroria
Aegis Of Galenwe
Vestment Of Olorime