GRAVEN DEEP
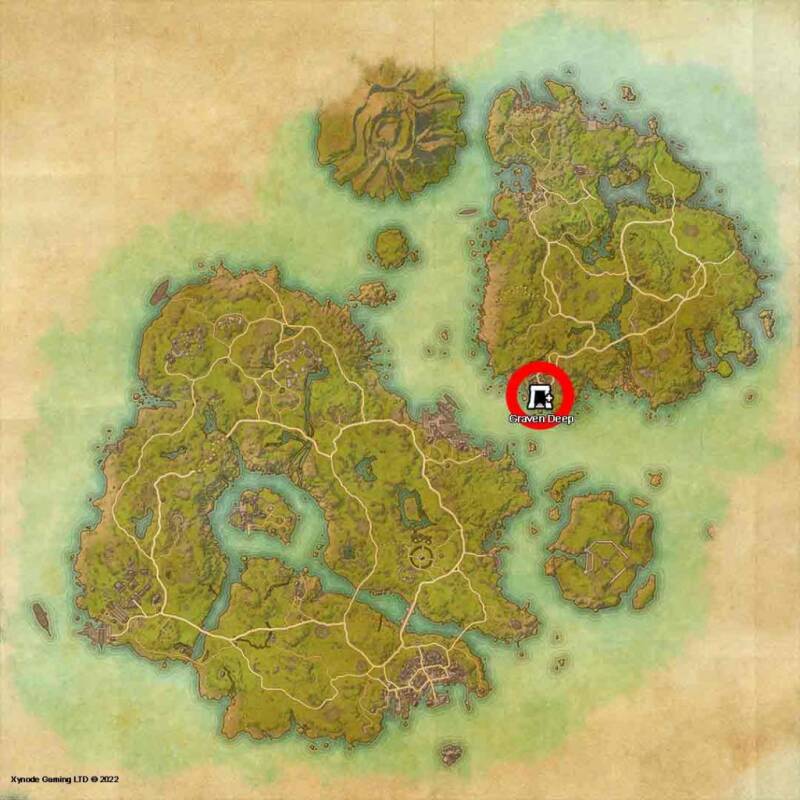
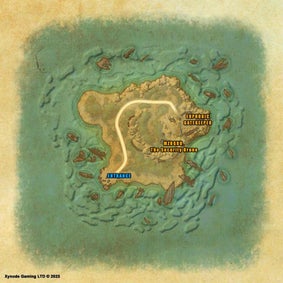
This dungeon you will have access to in the dungeon finder at level 45. However if you travel to it directly you can go in at any level. This dungeon is located in High Isle: Amenos as shown on the map below left.
The bosses are marked on the map below right with their names and locations. This Elder Scrolls Online Dungeon Guide will explain all you need to know about the mechanics as well as offering possible strategies for you to apply in order to defeat them.
Location

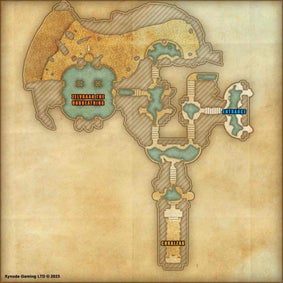
Boss Fights
Mzugru, The Security Drone (Secret Boss)
This boss while very cool is very simple to master. Finding it is also pretty easy. Just before you approach the first boss, there is a path to the right. Kill the adds, run to the end and you will see a Dwemmer elevator/hatch of sorts. You will be taken down stairs into a room where there are 4 buttons that need to be pressed.
Press them in the right order and the boss will spawn. Fail and you will just have to keep restarting the sequence until you figure it out.
Once the fight starts the boss will need to be held dead in the middle of the room. be sure the tank keeps it turned away from the group, block the big stuff and hold it still. DON’T run around.
Lightning – The boss shoot lightning into the air and then AOE lightning attacks will land on the ground. Simply walk out of these before they hit you. Very straight forward mechanic.
Immunity Shield! – The boss drop into a shield state. He will be immune. During this time the boss will heal until you kill the Pylons in the room. Once they are down you can attack him again. Pretty simple. This is on a timer, so if you take longer to kill him, you just have to see the mechanic more often. It’s not the end of the world, just rinse repeat
Spinny Spinny! – The boss will occasionally go into a rotating spin attack. Simply stay out of it. The tank can block it, the rest of the group just have to step back a couple of feet.
Honestly this boss is somewhat trivial for even the least experienced of players, this is to give you a nice early buff from the secret boss kill and to prepare you for what’s to come…
The rest is NOT so “easy”!
The Euphotic Gatekeeper
This boss is extremely MOBILE within reason, however this CAN be controlled by taking a step back and watching his routine. The boss will move all over the place based on specific mechanics. As the tank, be sure to always maintain a taunt but the trick is this… DON’T chase him around the room. If he is “taunted” whatever he is doing he WILL come back.
SO, to simplify and always maintain control, instead of holding the boss in the middle of the room like most fights would make you do, instead stay closer to the edge. The reason for this is, YOU control which angle he comes at you from.
Holding him in the middle could me a lot of spinning around, but if you put YOUR back to the wall (not completely against it but in the vicinity at least) YOU control the fight and YOU decide which way is “away from the group”.
relax, maintain this and you will be fine. Panic however, and it’s all over.
A LOT of this fight is on the TANK.
TOTAL FLIP OUT! – The Boss will quite literally go into melt down mode and dart around the room like MAD! Don’t panic, as mentioned above, you CAN somewhat control what happens next. Running around will get you knocked over, he places AOEs all over the place to trip people up, going from one side to the other until he finally settles and comes back to the fight.
So long as a taunt is maintained he will go back to where he started but if not, he can start to run around hitting people. Relax, back against the wall as a tank, hold that taunt and wait for him to come back.
While this SEEMS scatty, this is technically in a bit of a triangle shape so you CAN anticipate his movement somewhat. This will give you the upper hand when trying to avoid his landing spots.
Adds and Burrows! – There will be up to 3 Burrows in the room of which adds will come out of. The adds will need to be killed to prevent too many complications but above all the Burrows mechanic needs to be understood.
ONE player will be targeted with a poison AOE and this will be physically attached to them. They need to QUICKLY run to a Burrow and plug it with the poison AOE by dropping it with a synergy activation.
Be warned: This will take priority over all other synergies so you COULD accidentally place it under you NOT in the hole. If this happens, get OUT QUICK! it does HUGE poison damage AND sometimes can potentially one shot people.
This will take some practice. The more aware of the mechanic you are, the easier it will get but again this will take time to learn.
During the fight this mechanic will be reintroduced over and over, generally when he teleports when there are none left, he will drop them there. Keep your eyes peeled as the tank because you will need to taunt the adds as SOON as they come in. They DO hurt if not dealt with.
Teleport – unlike the flip out charging mechanic, the boss will physically teleport to the other side of the room. Once he appears there he will created an exploding spreading AOE. Avoid this.
Again as the tank, calm your feet, maintain a taunt and control him. The middle of the room is NOT the best place to stand. Be sure YOU can control which way he faces at all times, too much spinning will make a mess.
TWINS! – The boss occasionally summon a mirror image of himself, with a low health bar. Technically you can kill it, but be careful. usually when it spawns the boss fires a heavy attack. However after a short period the add will explode. Watch your feet!
HARDMODE – Technically there is not a massive difference to hardmode. Typically the usual happens, higher health, more damage incoming, and faster paced add/burrow phases.
Also when teleporting, and/or jumping around the room, the small spreading AOEs that he fires are MANY more than usual.
Xzyviian, Defense Crawler (Secret Boss)
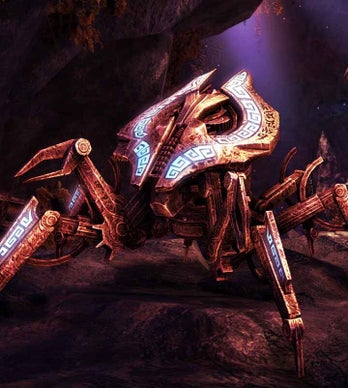
OMG it’s a SPIDER!
Yup, Giant Dwemer spider and all the nasty stuff that comes with it! Fire, AOEs and death!
Make sure your tank has this turned away from the group at all times! This can be a little mobile and you may need to move occasionally but above all, be sure to keep it turned away.
Heavy attack – The boss will very often fire off a heavy attack at the tank (or whoever has aggro). This needs to be BLOCKED as a tank, else it will hit very hard and potentially knock you down or kill you. But as a DPS or Healer, you should carefully time a dodge roll unless you are packing high enough resistances and shields to take it while blocking.
FIRE CONE! – The boss occasionally fire off a cone of flames at whoever has aggro (should be the tank). The is the key reason the boss should be always turned away from the group. You can block the damage as the tank but dps and healers really don’t want to be standing in this!
Mortar – The boss Stand completely still and spin his head firing off mortar shots into the room. Each shot will land on the floor dropping a sizeable circular fire AOE on the ground. This can fill the room pretty quickly so be sure to watch your feet.
Ninja flip! – The boss will occasionally flip into the air, landing with a direct aoe hit, be sure to avoid and/or block this mechanic when it happens.
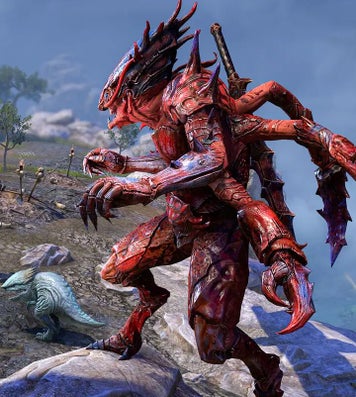
Varzunon
The boss starts off as quite a large boss…but he gets BIGGER!!! That’s right, this can get a little crazy! Unless you follow mechanics. But don’t worry there is a counter just in case it goes TOO nuts! The most important thing to remember that this is a boss ENCOUNTER not a boss FIGHT. Much like many mechanics in the game, this is about the combination of it all not one specific thing.
In short, pro tip. Focus the adds! The boss has NO overall, dps check. You can take as long as you need. But mechanics can alter how that goes.
Heavy attack – This mechanic pretty self explanatory, block it as the tank or die. If you are a dps/healer then be sure to dodge it if you have to but it really should not be hitting you!
Blast bones! – This nice and early on is actually the most important mechanic in the entire fight. While the fight is NOT a “DPS CHECK OR ELSE” it DOES have elements of bonuses if you can apply your damage correctly. Basically running around like a chicken will mean harder mechanics for you.
The boss will spawn glowing blueish skeletons that will walk slowly towards him. These don’t have masses of health so even low damage can kill them if FOCUSED. BUT, if you do NOT kill them, they will jump at him. This feeds him and he grows!
Each time he grows he will be stronger and stronger until he is absolutely enormous!
Don’t be TOO alarmed there IS a stopping point where he will grow no further, but at this point he will be hitting pretty hard!
As he grows in size he grows in strength. So technically if you can kill the skeletons nice and fast you won’t have so much to deal with BUT, there is a silver lining.
If you are a tanky tank and have plenty of heals, while he will be stronger, you CAN physically mitigate the incoming damage.
SO, if you have less deeps, have more survival and it can still be done no matter how much he scales.
Stomp! – The boss will occasionally let out a HUGE ground stomp. This is quite straight forward. Avoid it! The good thing about this mechanic is that it literally starts growing from the middle and doesn’t impact with damage until the circle is full. So you have time.
NOTE: The bigger the boss, the bigger the AOE stomp!
Channel and Pound – During the fight the boss will channel with his hands in the air ready to pound the ground and hurt you in the face. Watch your feet because during this time, rain like aoes are coming down and you will have to watch your feet!
Skeleton Adds – During the fight over and over multiple adds will spawn. These are generally different types, from Archers to Mages etc and should be focused as part of the major mechanics in the fight. If you don’t deal with them they will overwhelm you in time. So your tank should at least pull these near to the boss so that you can either focus or AOE damage them down next to him. Archers and mages have horrible cone and lightning attacks that need to be interrupted and/or avoided so watch your feet. Watch out especially on the hard mode for the Mages as they have multiple wind aoes that come out and they can cause a lot of problems.
There are also multiple melee skeletons that move very fast chasing the group. Don’t run around in circles, they don’t care that you are scared. They will not leave you alone because you are running. Try to focus on bringing these together so they can start taking damage in the same place (preferably near the boss for ease of execution).
Remember tanks have resources to manage too, so if you have aggro on something, bring it closer so they can grab them. Don’t run away to make it more difficult and then call the tank a noob because of YOUR error and panicking
HARDMODE
As you would expect from any hard mode version of a fight, the boss has more health and hits harder. However the mechanics of this fight get simply a little more frantic rather than adding too many EXTRA complications.
Technically speaking apart from the regular mechanics there is ONE major mechanic down below, and in the mean time he summons a fair amount more adds. Things you are already used to, just more of them.
POUND! – The boss generally channels up a huge attack and hits the ground but this is different to the stomp mechanic.
When he does this on hardmode he will cause multiple AOEs in a straight line through him and they will sit there constantly doing damage until he does it again and places new ones. Watch your feet they HURT!
NOTE: If you activate the secret laser beam on the skeleton, while it does small damage, it does actually take him down by ONE stage size wise. He can grow again, but it allows you to counter the stages if necessary!
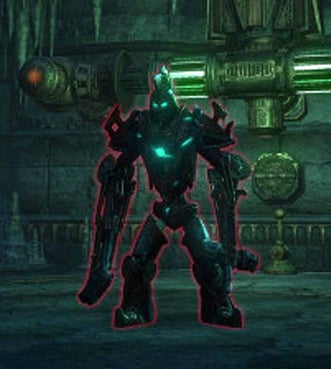
Chralzak, Sphere 9402-A (Secret Boss)
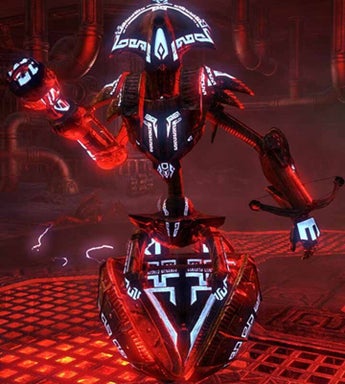
This is the final secret boss and if you understand how Spheres in ESO generally work you will be somewhat familiar with the mechanics, however there are some additions to that tool set they already have at base. As the Tank of course be sure that this guy is turned away from the group as much as possible to avoid any potential frontal hits to other members of your team!
Heavy/Light Attacks – Basic hits for the tank to deal with, be sure to block.
Spin – Standard stuff for a Dwemer Sphere enemy, he will spin repeatedly for a short period of time and the AOE around him will of course hit you repeatedly if you stand in it. So simply DON’T stand in it. Tanks can block it but anyone else should step back.
Bombs! – The boss will randomly aim at a player in the group and fire a bomb at them. When this hits the floor it will place a rather large shock aoe. Simply avoid this! Step out of it, it will fade and then carry on hitting the boss.
For the most part this boss is a bit stack and burn, but be sure to watch out for the two major mechanics as they do hit pretty hard!
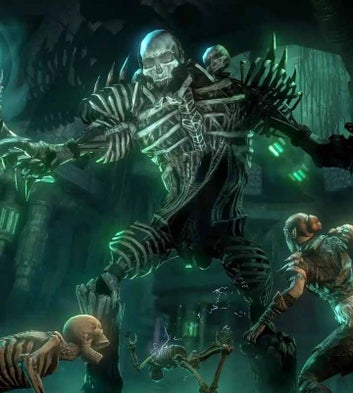
Zelvraak The Unbreathing
This boss in it’s first week was responsible for 67,000+ WIPES!
Not necessarily because of it’s difficulty, but because of ONE BASIC and very PUNISHING mechanic!
In this fight formation is key! You can apply whatever strategies you like but i personally think this one adds to much more AWARENESS for the whole group about the ONE thing that will screw people up.
SO i suggest that you place yourselves around the centre of the room in a square formation. The tank should stay as close to their spot as possible (for reasons) throughout the fight and the group should be in their own spots the majority of the time. Be sure revisit that formation whenever it has to be broken by a side mechanic and that said mechanic is OVER. Formation is key!
This is for a very simple reason. You are looking over everyone else’s shoulders from your perspective so each person can see more. You cannot all keep turning around to one direction, or all only seeing ONE direction combined, you all need to be responsible in spotting what is behind someone else. So communication (whatever form you use for emotes, chat, voice, text) is KEY!
BUBBLES!!!! – The most IMPORTANT mechanic in the ENTIRE encounter! During the fight there are 4 major areas that have a hole in the ceiling (excluding the centre). THIS is the reason for the formation. The more you can see form your perspective, the more likely you are to spot one of them from BEHIND another player that cannot see it.
Anyway, these holes on random rotation will let lose a slow falling bubble. It takes roughly 10seconds to go from ceiling to floor and if it ALMOST hits the floor about the same amount of time to go back up. Unless you hit it early of course.
However, after 40% they will get much faster! And sometimes get almost two at a time!
What’s the trick? Simple. If you see one, HIT IT! It doesn’t matter HOW much damage you do, a light attack a heavy attack whatever. HIT IT and send it back to where it came from.
Literally the most EASY too APPLY mechanic in the fight, but the MOST failed one across the entire community.
Why? Because if you miss it, the entire room 100% wipes wipes. No passing go, no collecting jaw bones off the floor.
DEAD! Hit the orbs, or die. Above all other mechanics, THIS one will kill you and is the HIGHEST priority.
Don’t be lazy. You will die.
Heavy Attack Cone! – The boss Has a very nasty heavy attack, Along side a regular heavy attack telegraph is a HUGE cone attack in the direction he is facing!
This gets progressively worse and underlines why i stated above that the tank needs to focus on their formation spot a LOT!
SPLIT! – During the fight the boss will split Leaving a ghost version of itself behind. This is why the tank does not want to run around the room too much. Each split ghost will park itself where it spawns and for the rest of the fight, ever single time the boss does it’s cone attack, it TOO will do one in the direction the boss is facing. If you can control the boss well and not run around too much, you can almost stack these and have them all facing the same way as and when it happens. But if you go full on cockroach and run around too much, they will be scattered all over the room and each phase will be harder to gauge where the cones are coming from until it is inevitably too late.
Focus, Control, DON’T RUN!
FEAR!! – This fear is very different from any regular fear in the game. Usually you can CC break but in here you 100% cannot!
Instead what you cannot see doesn’t scare you! So, when you see the boss channelling, there will be a skulls and black smoke emitting from him. You need to physically turn your character AWAY from him! Not your camera, YOU. If you turn away, and it goes boom, you will NOT be feared. However if you fail, you will be feared for 3 seconds and you CANNOT break it.
If you are the tank you are pretty much dead as this normally is followed by his cone heavy attack! Getting hit by that when you are feared basically puts you in a grave!
Reflections – The boss will at around 75 (depending on phases at the time, you can over burn the health mid mechanics. And again at 25 (then periodically afterwards) the boss will spawn 4x reflections of itself. These will fire projectiles at the group which CAN be dodged but also can be interrupted. The simplest way is to get one player on each corner, and keep on the interrupts while the dps kill them one by one until they are gone. But failing that essentially, they have to die and you have to live. So just be aware, if you do not pay attention to interrupts and/or kill them, they will all hit you at once and it will make short work of the group.
Ice! – In the second phase of the fight the boss will start to cast ICE aoes on the ground to force you to move a lot. These are easy to avoid simply watch your feet and be sure to keep on top of your formation!
OH NO MY SOUL!! – As weird as it sounds, the boss will push your soul out of your body! And your soul will run around like a headless chicken in random directions away from you! During this time you have damage over time hitting you while you rapidly die and cannot be healed! The only way to live is to run after your soul and collect it! Be fast!
The Realm of “No idea what it’s called” – At around half way through the fight (50% health) the boss will put EVERY player into their own instance. You all SOLO have to survive in your own room! No heals function so don’t even bother trying to heal.
In this room there are white ghosts and black ghosts. The white ones will walk around slowly and you must one around and collect these to keep up heal over time on yourself.
The black ghosts will be flying in from the sides to get to the middle and you must kill as many as possible.
Don’t worry about how much dps you have because that actually makes no difference, they will die to ONE damage!
The more ghosts you kill the better until the phase is over!
Atronach – After the above mechanic, a HUGE Flesh abomination will spawn. Much like the one you encounter before starting the fight initially. This hits incredibly hard, has nasty aoe cleave type attacks and has a decent chunk of health. He is a priority. Help your tank out and get rid of this thing quick!
If you cannot kill it fast, at least make sure it is still your main focus and keep the tank alive! You may have to be chunkier if you have less dps. It’s not a dps race at all, but the sooner the pressure is off the tank the better.
NOTE: IF your group is very successful in the above phase, and MOST ghosts are killed, the Flesh Abomination will be a Flesh Atronach instead, which is MUCH smaller with MUCH less health and MUCH less of a threat!
HARDMODE!!
Mimic – The Soul stealing mechanic is MUCH more aggressive on hardmode. Firstly, it actually applies to TWO people rather than just ONE. And secondly whatever CLASS you are, the boss will MIMIC your major aesthetic! So if you are a Dragonknight he does fire, if you are a Sorcerer he does lightning, Warden he does ice, etc etc.
Be ready for the healer to be on their toes for the new incoming damage which will alter depending on the players affected.
NOTE: The reflections ALSO carry the Mimic benefit if it happened recently.
Resurrection or Horde? – The downside to being dead is more than being dead. You are fighting a physical LICH! And he makes sure you don’t forget it. If someone DIES, they leave a Tombstone on the ground. And while they are dead and staying dead, it will rapidly spit out skeleton adds that you need to kill. They don’t have a lot of health but there is ENOUGH going on already without this headache!
inferno – During the fight the boss light the fires above his head with literal FIRE! Not the regular bluish colour they are, but actual yellow/orangey fire. When this happens he will constantly spit fire at all members of the group, so healers, be on point with your hots to counter it!
NOTES:
In a nut shell, keep the boss as still as possible, hit him in the back of the face and ALWAYS stay in formation as much as you can so you can see more of the room each and can spot what is happening behind each other.
When he fears, turn away. When the bubbles come (they have a sound also) be sure to hit them, and when the adds come, interrupt and kill them.
After the portal phase, once the Atronach is down, no NEW game breaking mechanics are seen, so basically if you can get TO the portal, you have done everything you need to do once and just have to repeat it.
There is NO DPS CHECK for the boss, so the last phase (40% and under) you can take as long as you like, just be sure to repeat the mechanics until it is dead and DON’T PANIC!
If you miss ONE bubble…you are all dead. The rest is not so bad.
This is renowned for being “one of the most difficult bosses” but in actual fact it is the easiest mechanic that people generally get wrong.
Focus, you can do it!
GOOD LUCK!!!
Dungeon Loot
Here is a list of all the loot you can expect to find in Graven Deep. On normal the loot is blue and the boss does NOT drop a monster helmet, but on veteran difficulty all of the loot is purple and the last boss DOES drop a special monster helmet.
Note in dungeons some individual boss can drop a unique item but generally the weapons and jewellery (non named items) come form the last boss. HOWEVER the entire loot table can also drop from trash and chests, so loot everything!
Note: in dungeons some individual bosses can drop a unique item but generally, the weapons and jewelry (non-named items) come from the last boss. HOWEVER the entire loot table can also drop from trash and chests, so loot everything! Got the gear in the wrong traits? Don’t worry! You can alter the traits by either transmuting or reconstruct the piece with a trait of your choice.
If you are looking for the matching shoulder monster piece, visit Urgarlag Chief-bane at the nearest Undaunted enclave. She sells a 50/50 chance at the shoulder piece as part of the Ascending Tide coffer or it could be in her mystery coffer.
Grave Inevitability
Pangrit Denmother
Phylactery’s Grasp
Euphotic Gatekeeper (vet only)